If you’ve updated your iPhone to iOS 11, you might be wondering how to use all the new camera and photo features. Here’s a rundown of what’s new and how to use it.
The first thing you’ll notice is that the Camera app has a new look.
The shutter button is now bigger and easier to press, and there are new filters to choose from. To access the filters, just swipe left or right on the screen.
One of the most exciting new features is the ability to take Live Photos with effects.
To do this, just open the Camera app and select “Live Photo” from the bottom menu. Then, choose an effect from the list that appears. You can also add these effects later by editing your Live Photo in the Photos app.
- With iOS 11, you can now take Live Photos with the volume down button on your iPhone
- Simply press and hold the volume down button to start taking a Live Photo, then release it when you’re done
- The resulting Live Photo will include any movement or sound that happened while you were taking it
- You can also edit your Live Photos now with new loop and bounce effects, as well as long exposure effects
- To access these new editing options, simply open a Live Photo in the Photos app and press the Edit button
- iOS 11 also brings a brand new Files app to replace the iCloud Drive app
- The Files app gives you access to all of your files stored in iCloud Drive, as well as those stored locally on your device
- You can browse through files using a variety of different views, including list view, column view, and cover flow view
- One of the coolest new features in iOS 11 is called Portrait Lighting
- This feature uses depth information captured by the iPhone’s dual cameras to simulate different lighting conditions when taking portrait photos
- To access Portrait Lighting, simply open the Camera app and swipe to the Portrait mode option at the bottom of the screen (if you don’t see this option, make sure both of your iPhone’s cameras are enabled in Settings)
- Then tap on the lightning bolt icon next to the shutter button to select from one of five different lighting options: Natural Light, Studio Light, Contour Light, Stage Light, or Stage Light Mono
Credit: www.dxomark.com
How Do You Use the Camera Feature on Iphone 11?
Assuming you would like a blog post discussing how to use the camera feature on the iPhone 11:
The iPhone 11 has two cameras, not just one. There’s a wide-angle camera and an ultra-wide angle camera.
The former is your standard go-to camera, while the latter is perfect for when you want to capture more in the frame.
To switch between them, tap on the 0.5x button next to the shutter button in Camera mode. If you want to take a picture using both cameras at once, simply tap on the 2x button – this will engage what’s called ‘Smart HDR’, where the phone takes multiple pictures at different exposures and combines them together for more dynamic range.
One of the headline features of iOS 13 is Deep Fusion, which uses machine learning to optimize photos taken with an iPhone 11’s main camera at medium-to-low light by fusing nine images together (eight short images and one long exposure) before applying image processing algorithms. The result should be less noise and more detail in low light without sacrificing sharpness or color accuracy elsewhere — all without making any changes that are noticeable to users except for perhaps better-looking photos overall.
How Do You Use the Apple Camera Features?
iOS has a great built-in camera app that is easy to use and packed with features. Here are some tips on how to get the most out of the Apple camera features:
1. Use the grid lines to help you compose your shot.
The grid lines can be turned on in the Settings app under Camera > Grid. This will help you keep your horizons level and your subject in frame.
2. Take advantage of the different exposure modes.
If you want to manually control the exposure, tap on the screen where it says “AE/AF Lock”. This will lock in the current exposure and focus settings so you can experiment with different shutter speeds and apertures without worrying about the camera changing things on you.
3. Use HDR mode for high contrast scenes.
HDR (High Dynamic Range) mode takes multiple exposures and combines them into one image to give you better results in high contrast situations. It’s especially helpful when there’s a big difference between the lightest and darkest areas of your scene.
4 .
Use Panorama mode for wide shots . Panorama mode stitches together multiple photos to create one wide image . It’s perfect for landscapes or group shots .
Just tap the Panorama icon in the camera app , then pan your phone slowly from side to side while keeping it pointed at your subject matter .
5 . Shoot in RAW for more editing options later .
When you shoot in RAW format , all of the image data captured by your sensor is saved to disk unprocessed . This gives you much more flexibility when editing later , as you can adjust things like white balance , Exposure , etc., without worrying about losing quality . To shoot in RAW , just open up Settings > Camera > Format and select “RAW+JPEG” or “RAW” .
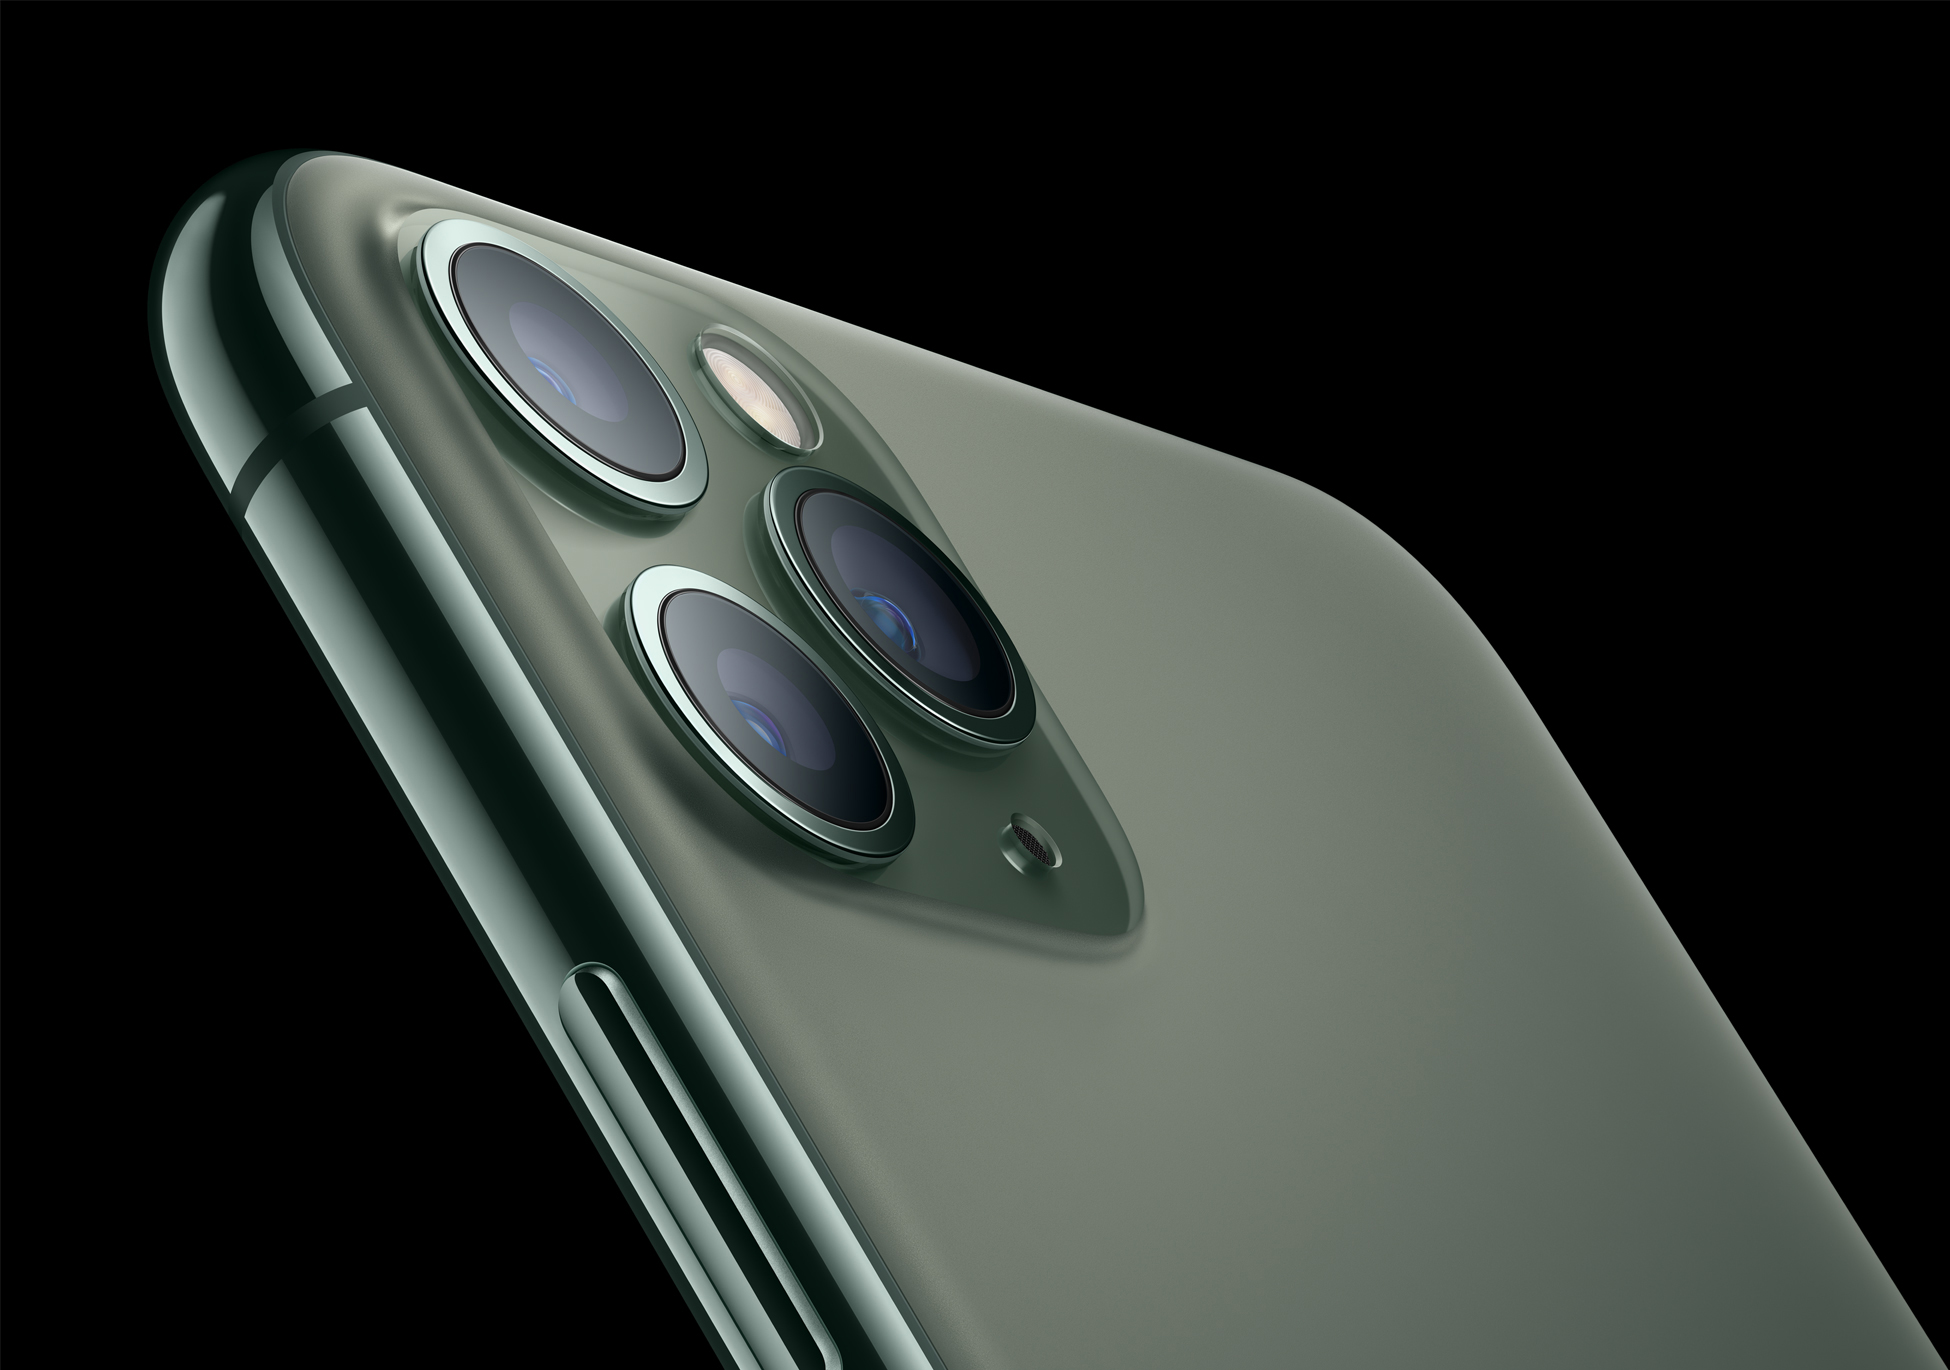
What Do the Three Cameras on Iphone 11 Do?
The iPhone 11 has three cameras: a wide-angle camera, an ultra-wide-angle camera, and a telephoto camera.
The wide-angle camera is the main camera. It has an f/1.8 aperture and can capture 2x optical zoom and digital zoom up to 5x.
The sensor size is 1/2.55 inches.
The ultra-wide-angle camera has an f/2.4 aperture and a 120 degree field of view. It can’t zoom optically, but can digitally zoom up to 3x.
The sensor size is 1/3.6 inches.
The telephoto camera has an f/2.0 aperture and can do 2x optical zoom and digital zoom up to 6x.
What are the Camera Modes in Iphone 11?
The iPhone 11 has several camera modes that allow you to take pictures and videos in different ways. Some of the camera modes are:
– Photo: This is the default mode and it allows you to take still photos.
– Video: As the name suggests, this mode allows you to record videos.
– Slo-mo: This mode records videos at a slower frame rate, which makes fast movements look slowed down when played back.
– Time lapse: This mode records video over a period of time and condenses it into a shorter video.
– Portrait: This mode blurs the background of your photo to make the subject stand out more.
– Panorama: This mode lets you capture wide, sweeping landscapes or large groups of people in one photo.
How To Use The iPhone 11 & 11 Pro Camera Tutorial – Tips, Tricks & Features
Iphone 11 Camera Settings for Best Pictures
If you want to take the best photos with your new iPhone 11, then you need to know about all of the camera settings. Here are some tips for getting the most out of your iPhone 11 camera.
The first thing you need to do is make sure that your iPhone 11 is running the latest software.
To do this, go to Settings > General > Software Update. If there is an update available, install it. This will ensure that you have all of the latest features and bug fixes for the camera.
Next, open up the Camera app and swipe to choose which mode you want to use. The options are Photo, Video, Slo-Mo, Time-Lapse, Portrait, and Pano. Each mode has different settings that can be adjusted, so experiment with each one to see what works best for you.
In Photo mode, tap on the three dots in the top right corner of the screen to access the Settings menu. Here you can adjust things like HDR (High Dynamic Range), timer, grid lines, aspect ratio (4:3 or 16:9), and Live Photo. HDR helps improve photo quality in high contrast situations by taking multiple photos at different exposures and combining them into one image.
The Timer setting lets you choose how long of a delay there should be before taking a photo after pressing the shutter button – 2 seconds or 10 seconds works well for most people. Grid lines help composition by dividing up the frame into thirds both horizontally and vertically – turn them on if they’re helpful or leave them off if you prefer not seeing them in your viewfinder. Aspect ratio let’s you change whether your photos are saved in a 4:3 format (the traditional size) or 16:9 (widescreen).
And finally Live Photo captures a short video along with your still photo – it’s fun to play around with but doesn’t always result in a great photo so use it sparingly!
Once you’ve got all of your settings dialed in, start taking some pictures! Experiment with different compositions and subjects until you get a feel for how everything works together.
And don’t forget to have fun – that’s what photography is all about!
Conclusion
The new iOS 11 has some great camera and photo features that are sure to please users. One of the most notable changes is the addition of a new HEIF (High Efficiency Image Format) option. This format can compress photos up to twice as much as the standard JPEG format, without compromising quality.
Additionally, Live Photos can now be edited with various filters and effects, and you can also trim them down to a specific section that you want to loop or share. Finally, there’s a new Portrait Lighting mode for iPhone 7 Plus users that simulates different lighting conditions on your subject’s face.